
Installing side marker lights
This is a simple modification strictly to enhance the appearance of your Ford Probe. Do not expect any horsepower, but do expect to get better safety on the road.
First, go and buy the lights of course. They usually run between $20-$30 for the pair. They can be purchased at any performance shop or catalogues. They will have many different styles to choose from. Ensure the package has all the necessary hardware for installation (screws, moldings, etc).
After you have purchased the lights, check the package for instructions. Follow all of the instructions carefully. These instructions will usually have a cutout/layout diagram which will make the job much easier. If there are not any instructions or diagrams, do not worry. You can use the rubber seal/gasket supplied with the light as a template.
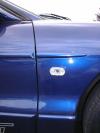
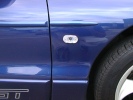
First, decide the area where you would like the lights to go, and ensure it is clean before starting any work. Second, if you would like to place the lights in the same place as mine, layout the diagram or the gasket 3 1/2” from the doors on the fender section behind the front wheels and 7 3/8” from the top of the fender skirt as illustrated in Figure 02. I found this to be the best spot because it’s visible and it looks the best. The choice is yours as where to put it, but in my opinion, it wouldn’t look nice anywhere else since I have the side moldings. Third, stencil out the holes lightly using a pencil. Emphasis on lightly, in case you make a mistake. If you do you can erase it with out making any damaging marks.
Well, now it’s time to cut. Put your safety glasses on. Always take precaution when using cutting or high-speed tools. Grab your hammer and punch and tap a hole in the center of where the lights will go. This will give your drill a starting point and prevent it from slipping while drilling. Using a XXX bit or bigger, drill a hole in the punched area. DO NOT PUSH HARD OR YOU WILL DENT IN THE FENDER!!!! This hole will allow a beginning point for your Dremel. Using your Dremel tool with a 9901 bit (Figure 03), set it to the highest speed, and slowly cut away, ensuring you stay within the stenciled boundaries. Once the cut is complete, fit test the your lights. You might have to use a file to smooth the edges. Cover all exposed metal with touch-up paint to prevent rust. If it locks/ fits right, let’s move on to the next step which will be wiring.
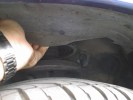
Open the hood and route two 9 ft. wires underneath the wheel well covers from the fender hole to the turn signals. Just pull back the cover as shown on figure 04. You should come up through the holes behind the flip-up lights and then back down into the front, exposing the wire underneath the front corner of the bumper. (See figure 05) You will find the turn signal wire underneath the front corners of your vehicle. It will be a tight spot to work in unless you let the bulb hang for easier access.
Hook the positive wire to the GREEN wire and the negative wire to the RED wire on the turn signals, and none to the ground wire (BLACK). This way, they will always blink with the turn signals and they will also come on when you turn on your headlights and alternate blinking. If you want them purely as side blinkers, hook the positive wire to the GREEN and negative wire to the BLACK on turn signal. They will not come on when you turn on your lights, but they will still blink in conjunction with the turn signals. (The RED is a constant hot wire and when the lights are on it will make the side markers just stay on and not blink).
Now we will splice the side marker wires into the 9 ft wire. First, put the gasket on the side marker. Next, take the white wires and splice them together using the scotch locks. Do the same with the black wires. Place a small amount of electric tape around the scotch locks if desired. It’s just a preventive measure from disconnecting due to vibration or the harsh environment.
Do a full test on all the lights and make sure they function properly. Place the marker, turn signals, wheel well cover and anything else removed back in its proper place. Repeat the same process for the other side. Now turn off the lights in your garage or wait until nighttime and go show off your Euro-Probe GT.
Write-up and pictures by J. Ferrin